
How to implement Google login in website
Now-a-days it is very common to see Login with Google and Login to Facebook and other similar login options. So today I will explain how to…
Now-a-days it is very common to see Login with Google and Login to Facebook and other similar login options. So today I will explain how to implement such login in your web application. My motive is that after reading this post you must be able to implement any such login in your own.
In todays scenario its not only about making an app, because anybody can do that there are plenty of materials available in the internet. But what makes your app different from others is UI/UX. UI stands for user interface and UX for User Experience. I guess I don’t need to explain much about UI because the word itself defines the meaning of it. So what the hell is UX.
Well its all about how a user feels when he or she uses your app. Suppose considering an example of an e-Commerce app. The more important things is in how much clicks a user can order anything from your app neglecting the offers and other stuffs. Or how much ease is your app for doing any task. Just assume the senario that you are using an app and you are not getting how to do any thing. Because the ultimate purpose of you downloading that app only means that you want any task to be done. And you are unable to figure out how to do. Or its something like just tap, tap and tap. I am sure you will uninstall that app.
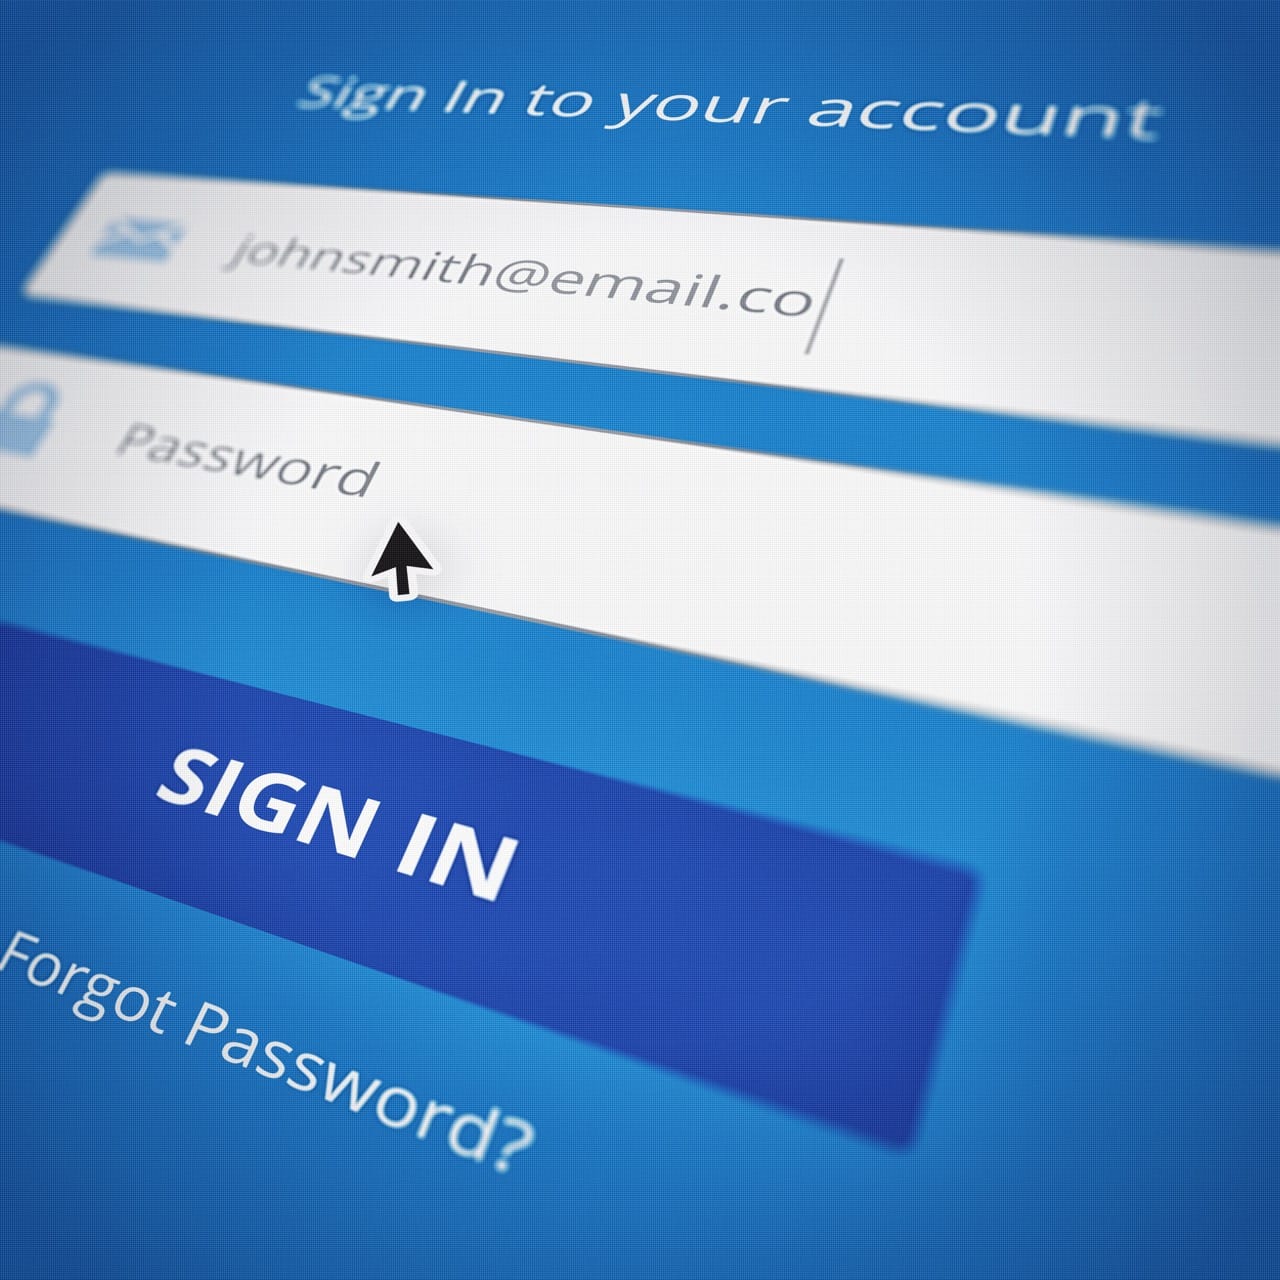
So now question arises how implementing such login will improve UX. Well, if I am using my own login service then I need the data of user considering the minimum first name, last name, and email address. So while signing up what will be better for a user manually feed all the informations or just click a button and you are in. Second sounds better right. And one more things is that we don’t need to verify whether user has given a valid email, contact no or any such required things. (We need to remember that the required thing must be provided in the API). If you want to learn about API check my last post.
We need to remember that every login service providers may have different methods of providing API, with different conditions, constraints. Don’t assume that it is hard. I am sure after this post you will surely find it easy to implement any such feature. Now coming back to Google login they require you to create a project in your google developers console. So basically it is a place to manage all your API crendetials. Well now what are these API credentials these are something which identifies you so that only you can use those APIs under your name/product name. Simply visit this url you will get all the informations required. I will simply re-explain those steps. You may see a new word OAuth so besically what it means? may be your first question.
May be this answer may help you. And if you still want to learn more visit its wikipedia page.
Now in the same page you will see Create Project Button click it. You must be logged in with you google account. So first of all create or select a project. When you use any API from google you have to create a project in the console. You can make the same project on the link given in the same page. Now select any project and then select a client i.e. from where you will be calling those APIs. Since we will be dealing with GitHub pages just select web browser because we will be calling those APIs from web browser. ANd in the url field enter https://github-username.github.io since my username in GitHub is kdpisda.
So the required url in my case would be https://kdpisda.github.io.
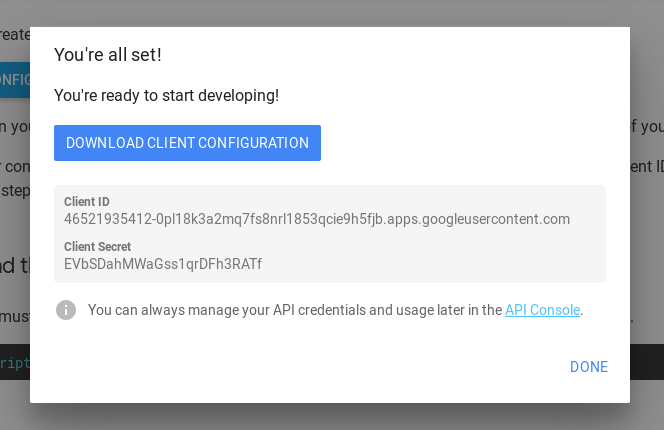
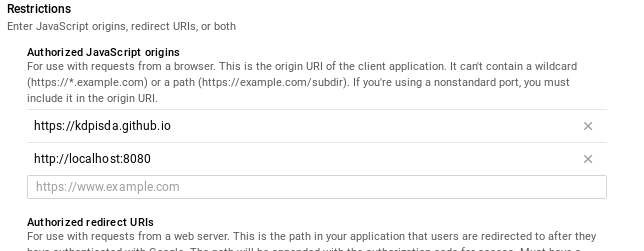
You may see similar screen. Now either download the credentials given i.e. Client Id and Client Secret. We need to remember one thing that we have specified the url origin from which we will be calling those APIs so thats why I haven't blurred the credentials. And those API under my name would be called from an URL with the origin as https://kdpisda.github.io. It means any thing with the url as https://kdpisda.github.io/something, https://kdpisda.github.io/something/something or any similar page may use those API's and it adds an extra security layer for using those APIs.
You may be wondering how to test the same thing in your browser without using making a github page. For this thing you need to simply whitelist the URL which you want to use for testing the best way to do is make a localhost server. There are many ways to create a simple http server in localhost. I will be using node http-server for the same. You may use simple python server too. Follow this link to create the same using python or this link for node http-server. The only thing which you have to do is cd to the project directory and in terminal type http-server is you are using node for server or you may find how to do using python in the link given above.
Now add http://localhost:8080 in the api console wo allow localhost for using those APIs.
Now visit https://console.developers.google.com for doing the same. Select the project which you created earlier. And now add http://localhost:8080 in the list. And click save button to apply the same.
So I wrote a bit html to style and used w3css for styling. Here is the HTML which is self explanatory:
<html>
	<head>
		<title>Google Signin Example</title>
		<meta name="google-signin-client_id" content="46521935412-0pl18k3a2mq7fs8nrl1853qcie9h5fjb.apps.googleusercontent.com">
		<script src="https://apis.google.com/js/platform.js" async defer></script>
		<script src="https://ajax.googleapis.com/ajax/libs/jquery/3.3.1/jquery.min.js"></script>
		<script type="text/javascript" src="main.js"></script>
		<link rel="stylesheet" href="https://www.w3schools.com/w3css/4/w3.css">
	</head>
	<body>
		<center>
			<div class="w3-container w3-teal">
			  <h1>Google Login Example</h1>
			  <p>An example showing how to implement google login</p>
			</div>
			<div class="w3-container" id="signin-container">
				<br>
				<div class="w3-row w3-center">
					<div class="w3-col l12 m12 s12" style="left:50%">
						<div class="w3-card-4">
							<header class="w3-container w3-blue">
								<h1>Sign in</h1>
							</header>
							<div class="w3-container">
								<br>
								<center>
									<div class="g-signin2" data-onsuccess="onSignIn"></div>
								</center>
								<br>
							</div>
							<footer class="w3-container w3-blue">
							  <h5>Read more at <a href="http://www.kdpisda.tech/">www.kdpisda.tech</a></h5>
							</footer>

							</div>
						</div>
					</div>
				</div>
			</div>
			<div class="w3-container w3-center" id="signout-container" >
				<br>
				<div class="w3-row w3-center">
					<div class="w3-col l12 m12 s12" style="left:50%">
						<div class="w3-card-4">
							<header class="w3-container w3-blue">
								<p id="loggedUsername">UserName</p>
							</header>
							<div class="w3-container">
								<br>
								<img src="img_fjords.jpg" alt="Norway" id="loggedUserImage">
								<p id="loggedUserEmail">EMail</p>
							</div>
							<footer class="w3-container w3-blue">
								<a href="#" onclick="signOut();">Sign out</a>
							</footer>
						</div>
					</div>
				</div>
			</div>
		</center>
	</body>
</html>
I have used JQuery too. Here is my final JS
$(document).ready(function(){
	$("#signout-container").hide();
});
function onSignIn(googleUser) {
  var profile = googleUser.getBasicProfile();
  $("#signout-container").show();
  $("#signin-container").hide();
  $("#loggedUserImage").attr("src", profile.getImageUrl());
  $("#loggedUsername").html(profile.getName());
  $("#loggedUserEmail").html(profile.getEmail());
  console.log('ID: ' + profile.getId()); // Do not send to your backend! Use an ID token instead.
  console.log('Name: ' + profile.getName());
  console.log('Image URL: ' + profile.getImageUrl());
  console.log('Email: ' + profile.getEmail()); // This is null if the 'email' scope is not present.
}
function signOut() {
	var auth2 = gapi.auth2.getAuthInstance();
	auth2.signOut().then(function () {
	  console.log('User signed out.');
	  $("#signout-container").hide();
	  $("#signin-container").show();
	});
}
You may find the live example at https://kdpisda.github.io/google-signin/. Go to repo settings in GitHub and on the github pages you will get your link too.
Here is the complete example at GitHub. Star, fork and update your credentails on index page to make it work on your localhost. Remeber to add URLs in you API console.
Follow me on Github and subscribe for more latest posts.
Hope you learned :-) .
Originally published at www.kdpisda.tech on March 30, 2018.
Follow me on
Become a subscriber receive the latest updates in your inbox.


Member discussion