


A Django ModelForm is a special kind of class that automatically builds a form right from a Django model. Think of it as a smart bridge; it looks at your model's fields and creates the corresponding form fields for you. This simple trick slashes the amount of boilerplate code you have to write for creating, updating, and validating data.
The Hidden Cost of Manual Form Building
Remember the last time you built a standard web form from scratch? You had to define every single field in a forms.py file, cook up specific validation logic, and then painstakingly map each input back to your database model inside the view. It's a repetitive, error prone grind I like to call "form boilerplate hell."
I once lost a whole afternoon debugging why a user's profile updates weren't saving. The culprit? A single mistyped field name while I was cleaning the POST data. It was a tiny typo that cost me hours. This is the exact kind of tedious, soul crushing work that the Django philosophy is designed to eliminate.

Why Manual Forms Are a Trap
The fundamental problem with building forms by hand is that it violates a core software principle: Don’t Repeat Yourself (DRY). When you manually create a form for a model, you're essentially duplicating information that Django already has.
- You define fields twice: Once in
models.pyand then you do it all over again informs.py. - You write redundant validation: Basic checks like
max_lengthorrequiredhave to be specified in both places, creating two sources of truth. - You manually handle data transfer: Your view code gets bloated with logic just to shuffle data from the form object into the model instance.
This duplication doesn't just eat up your time; it sets you up for a maintenance nightmare. Every time you tweak a model field, you have to remember to track down and update the corresponding form field and its validation logic. It's a recipe for bugs.
A Django ModelForm is not just a form; it's an intelligent layer that introspects your database models to automate the creation, validation, and saving of data. It’s your ticket out of boilerplate hell.
This idea has been central to the framework's efficiency for years. Django ModelForms have made web development simpler by making data validation and database interaction far more efficient. Before they became a core feature with Django 1.0 back in 2008, developers had to manually map every form field to its model field, a process that inflated both development time and the risk of errors.
And while we're talking about automation, it's worth noting that the principles of reducing manual work extend beyond just web forms. Exploring advanced strategies like AI document processing technologies can open up new ways to boost accuracy across all your data workflows. Our journey, however, starts right here—by embracing Django's built in automation to transform your development process from manual labor to elegant efficiency.
Right, enough with the theory. The best way to really get the power of a Django ModelForm is to roll up our sleeves and build one. We're going to create a simple blog application from the ground up.
This hands on exercise will give you that tangible "it just works" feeling, which is the perfect foundation for tackling more advanced customizations down the road. Our mission is to create a form that lets us publish new blog posts without drowning in a sea of boilerplate code.
Step 1: Defining the Model
Everything in a Django application starts with the model. Think of it as the single source of truth for your data's structure. In our new blog app, let's pop open models.py and define a simple Post model.
blog/models.py
from django.db import models from django.utils import timezone
class Post(models.Model): title = models.CharField(max_length=200) content = models.TextField() publication_date = models.DateTimeField(default=timezone.now)
def __str__(self):
    return self.title
This model is pretty straightforward with just three fields: a title, the main content, and a publication_date. But this is all the information Django needs to work its magic and build our form.
After defining the model, don't forget to run makemigrations and migrate to get your database schema updated.
Step 2: Creating the Django ModelForm
Now for the fun part. We'll create a new file, forms.py, inside our blog app. This is the conventional place to define forms, and it's where our PostForm will live.
blog/forms.py
from django import forms from .models import Post
class PostForm(forms.ModelForm): class Meta: model = Post fields = ['title', 'content']
Just take a second to appreciate how little code that was. Instead of re defining each form field (CharField, TextField, etc.), we just inherit from forms.ModelForm and let Django handle the introspection.
The innerMetaclass is the heart of this connection. It tells Django two crucial things: which model to base the form on (model = Post) and which fields from that model to actually show in the form (fields = ['title', 'content']).
You'll notice we intentionally left out publication_date. That's because we want it to default to the current time automatically, rather than letting the user set it. This ability to selectively include or exclude fields is a key feature for keeping your forms clean and secure.
Step 3: Rendering the Form in a Template
With our form class ready, it's time to put it on a page. This requires a simple view and an HTML template.
First, let's wire up the view in views.py:
blog/views.py
from django.shortcuts import render, redirect from .forms import PostForm
def create_post(request): if request.method == 'POST': form = PostForm(request.POST) if form.is_valid(): form.save() return redirect('somewhere_to_go_after_success') else: form = PostForm()
return render(request, 'blog/create_post.html', {'form': form})
This view logic is a classic Django pattern. It handles both displaying the empty form (for a GET request) and processing the submitted data (for a POST request).
Next, create the template create_post.html:
{% csrf_token %} {{ form.as_p }}Publish Post
That {{ form.as_p }} tag is a fantastic shortcut. It tells Django to render each form field wrapped neatly in a paragraph (<p>) tag. No need to manually write out all the <input> and <label> elements.
Step 4: The Final Payoff: Validating and Saving
This is where the true power of a ModelForm really shines. Look back at that create_post view. Two lines are doing all the heavy lifting for us.
if form.is_valid():This one method call kicks off a whole validation pipeline. Django automatically inspects thePostmodel and checks that thetitleisn't too long (based on ourmax_length=200) and that thecontentfield isn't empty. All that, for free.form.save():If the data passes validation, this single command creates a newPostinstance in memory, populates it with the cleaned data from the form, and saves it directly to the database. All that tedious manual data handling we talked about? Gone.
The official Django documentation provides a great overview of this exact process, showing the core structure we just implemented.
This screenshot captures the essential pattern you'll use over and over: define the model, create the ModelForm with its Meta class, and then wire it up in a view. What we've just built is the foundational block for virtually all data entry tasks in Django.
Customizing Form Fields and Widgets
The ModelForm we just built is fantastically efficient, but let's be honest—it’s a bit plain. Straight out of the box, it’s functional, but it won't win any design awards. Real world applications demand a better user experience. What happens when you need a rich text editor for your blog content, not a simple <textarea>? Or when you want a slick, interactive date picker instead of three separate dropdowns for the publication date?
This is where we move beyond mere functionality and start crafting a truly polished interface. Customizing a ModelForm is all about tailoring its appearance and behavior to fit your exact needs. Think of it as the difference between a generic rental car and your own, where every knob and button is exactly where you expect it to be. The good news? Django gives us powerful yet simple tools to make these changes without dismantling the beautiful model integration we love.
Unlocking Customization With Widgets
The secret to changing how a form field looks and feels lies in the widgets dictionary inside the Meta class. In Django, a widget is simply its representation of an HTML input element. By default, a TextField gets a Textarea widget, and a CharField gets a TextInput widget. But we can override these defaults with ease.
Let's upgrade our PostForm from the previous section. We'll give the content field a more generous size and add some helpful placeholder text to guide the user.
blog/forms.py
from django import forms from .models import Post
class PostForm(forms.ModelForm): class Meta: model = Post fields = ['title', 'content'] widgets = { 'content': forms.Textarea(attrs={'rows': 10, 'placeholder': 'Tell your story...'}), 'title': forms.TextInput(attrs={'placeholder': 'A Catchy Title'}), }
By adding that widgets dictionary, we’re telling Django to use specific widgets for our fields. We're still using a Textarea for content, but now we’ve customized its HTML attributes (attrs) to control its size and provide a helpful placeholder. This small change makes the form instantly more intuitive.
Here is a quick reference table showing how you can map different model fields to custom widgets for a better user experience.
| Common Widget Customizations for ModelForm Fields | | :--- | :--- | :--- | :--- | | Model Field Type | Default Widget | Common Custom Widget | Use Case Example | | CharField | TextInput | PasswordInput | Masking a password field for security. | | TextField | Textarea | Textarea(attrs={'rows': 20}) | Creating a larger input area for detailed content. | | EmailField | EmailInput | EmailInput(attrs={'placeholder': '[email protected]'}) | Guiding users on the expected email format. | | DateField | DateInput | DateInput(attrs={'type': 'date'}) | Leveraging the browser's native date picker UI. | | BooleanField | CheckboxInput | CheckboxInput(attrs={'class': 'custom-toggle'}) | Applying custom CSS for a styled toggle switch. | | ForeignKey | Select | Select(attrs={'class': 'select2'}) | Integrating a JavaScript library like Select2 for searchable dropdowns. |
This level of customization is key to building forms that are both powerful and user friendly.
Fine Tuning Labels and Help Text
Beyond widgets, you'll often need to control the text around your form fields. The default labels are generated directly from your model's field names, which aren't always user friendly (e.g., publication_date becomes "Publication date"). We can make these much clearer.
The labels and help_texts dictionaries in the Meta class are your tools for this job.
blog/forms.py
class PostForm(forms.ModelForm): class Meta: model = Post fields = ['title', 'content'] # ... existing widgets ... labels = { 'content': 'Your masterpiece', } help_texts = { 'title': 'Keep it short and engaging!', } Now, instead of "Content," the label for our textarea will proudly read "Your masterpiece." We’ve also added a subtle hint below the title field to guide the writer. These are the small touches that elevate a user interface from just functional to genuinely delightful. These kinds of tweaks are a core part of building professional interfaces, a topic often explored in depth in tutorials on mastering Django REST APIs and admin panel customization.
By combiningwidgets,labels, andhelp_texts, you gain complete control over your form's presentation without ever having to write raw HTML in your templates or sacrifice the automatic validation and saving provided by theModelForm.
This is the central trade off: a tiny bit more configuration in your forms.py file buys you a huge improvement in user experience. You maintain the DRY principle while crafting a form that looks and feels custom built.
Model level validation is a great first line of defense. It’s perfect for catching the simple stuff, like making sure a title doesn’t bust its max_length. But what about the messy, real world business rules that don't fit neatly into a model field's definition?
For instance, maybe a blog post title can't contain certain brand names. Or perhaps an event's start date must come before its end date. These are rules that depend on context and logic, not just simple data types. This is where you graduate from basic checks to true form level mastery.
I once spent hours chasing a bug where our system happily let users create "ghost" events—events where the end date was actually before the start date. The model's validation was silent because each DateTimeField was perfectly valid on its own. The problem was their relationship to each other, a classic scenario that demands a higher level of validation logic.
That experience taught me to really appreciate Django’s powerful form validation hooks. Let's dive into how you can use them to build forms that are not just functional, but genuinely robust.

Field Specific Rules With clean_fieldname
Let's start with the most common type of advanced validation: a special rule for a single field that goes beyond the model's constraints. Imagine we have a business rule stating that a blog post title cannot contain the word "Promo". The model's CharField has no idea about this, but our form can easily enforce it.
We do this by adding a method to our form class that follows a specific pattern: clean_<fieldname>().
blog/forms.py
from django import forms from .models import Post
class PostForm(forms.ModelForm): class Meta: model = Post fields = ['title', 'content']
def clean_title(self):
    # First, get the cleaned data for the field
    title = self.cleaned_data.get('title')

    # Now, apply our custom logic
    if "promo" in title.lower():
        raise forms.ValidationError("Titles cannot contain promotional terms.")

    # Always return the cleaned data, whether you changed it or not
    return title
It's a beautifully simple and effective pattern. When the form is validated, Django runs all its default checks first, then it looks for a method named clean_title. Inside our method, we grab the already cleaned data, apply our custom logic, and if something's wrong, we raise a ValidationError. Django then neatly attaches this error message directly to the title field when the form is re rendered.
Validating Across Multiple Fields
Now, let's tackle the bug I mentioned earlier, where one field's validity depends on another. This kind of check requires a method that can "see" all of the form's data at once. For that, we override the form's global clean() method.
Let's pretend our Post model now has start_date and end_date fields.
Assume our model and the form's Meta class now include start_date and end_date
class PostForm(forms.ModelForm): # ... Meta class and other methods ...
def clean(self):
    # It's crucial to call the parent clean() method first to get the initial cleaned data
    cleaned_data = super().clean()

    start_date = cleaned_data.get("start_date")
    end_date = cleaned_data.get("end_date")

    # Only proceed if both fields are present and valid so far
    if start_date and end_date:
        # Here's our cross field check
        if end_date < start_date:
            raise forms.ValidationError(
                "The end date cannot be before the start date."
            )

    return cleaned_data
The most important part of this is calling super().clean(). This single line runs all the individual field validations first (like our clean_title method) and populates the self.cleaned_data dictionary. Only then can we safely access all the fields from this dictionary and compare them.
When this cross field validation fails, the ValidationError we raise is considered a "non field error" because it doesn't belong to a single field. Django will typically display this kind of error right at the top of the form, providing clear feedback to the user.
Important: Always callsuper().clean()at the beginning of yourclean()method, and always return thecleaned_datadictionary at the end. Forgetting either of these steps will break the entire validation process.
This approach isn't just for HTML forms, either. The same principles are essential when you need to validate raw JSON POST request bodies for your APIs, ensuring data integrity across your entire application stack.
Managing Related Objects with Model Formsets
So far, we've nailed down single model forms. They're brilliant for creating or updating one object at a time. But what happens when the relationships get more complex?
Imagine trying to edit an invoice along with all of its line items on a single page. Or maybe a blog post and its dozen associated tags. Trying to stitch together individual forms for each of those related objects would be a quick descent into madness.
I remember this one project management tool I was building. A user needed to update the status of maybe ten tasks, all belonging to a single project. My first instinct was to build some messy loop of forms right in the template. It was clunky, a nightmare to validate, and it just felt wrong. This is the exact moment when you need to reach for a more powerful tool: the model formset.
A formset is exactly what it sounds like: a set of forms managed as a single unit. It's a clever layer on top of regular forms that lets you handle multiple instances of the same form all on one page.
The Magic of modelformset_factory
Django gives us a fantastic helper called modelformset_factory to automate this whole process. It works a lot like a ModelForm, but instead of a single object instance, it operates on a queryset of objects.
Let's walk through a practical example: managing all the Comment objects related to a specific Post.
First, we'll get the formset ready in our views.py.
blog/views.py
from django.forms import modelformset_factory from .models import Comment, Post
def manage_post_comments(request, post_id): post = Post.objects.get(pk=post_id) # Create a factory for the Comment model, showing only the 'body' and 'active' fields CommentFormSet = modelformset_factory(Comment, fields=('body', 'active'), extra=1)
if request.method == 'POST':
    formset = CommentFormSet(request.POST, queryset=Comment.objects.filter(post=post))
    if formset.is_valid():
        formset.save()
        # Redirect to the post or another success page
else:
    # For a GET request, populate the formset with existing comments for this post
    formset = CommentFormSet(queryset=Comment.objects.filter(post=post))

return render(request, 'blog/manage_comments.html', {'formset': formset})
The extra=1 argument is a neat trick. It tells the formset to always include one extra, empty form, which is perfect for adding a new comment. The queryset argument is the real key here, as it populates the formset with all the existing comments already linked to our post.
Rendering and Processing the Formset
The template side of things is surprisingly simple. You can just iterate over a formset like you would any list in Python.
{% csrf_token %} {{ formset.management_form }} {% for form in formset %} {{ form.as_p }}
{% endfor %}Save Changes
That {{ formset.management_form }} line is non negotiable. It renders a few hidden fields that Django uses to manage the whole collection of forms—tracking the total number of forms, how many there were initially, and which ones might be marked for deletion. Forgetting it is a classic mistake that will have you chasing down validation errors for hours.
This technique is a powerhouse for standard ForeignKey relationships. However, if your application design involves more dynamic relationships, you might want to look into mastering generic foreign keys for flexible models to handle an even wider array of scenarios.
This infographic breaks down the data flow for a standard Django ModelForm, from the user's input all the way to the database.
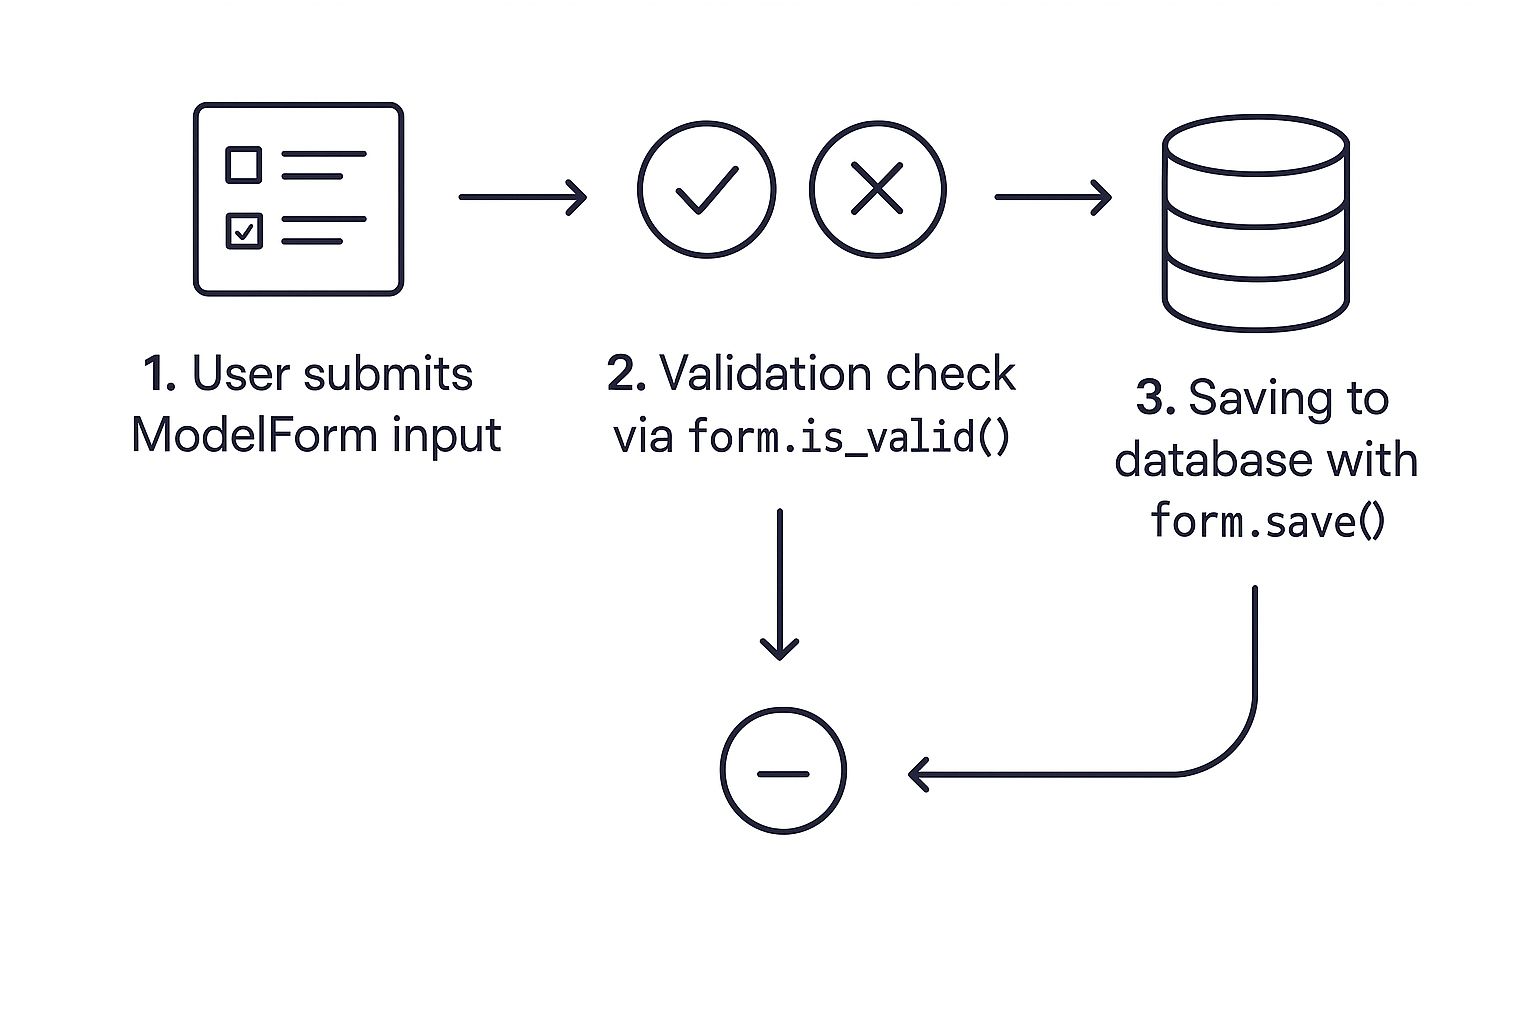
As the visual shows, it's a three step process: user submission, the crucial is_valid() check, and the final save() action. This is the same reliable process that powers each and every form inside a formset.
Common Mistakes and Lessons Learned
Every powerful tool has its quirks, and I've certainly spent my fair share of late nights debugging what turned out to be simple ModelForm misunderstandings. This section is a collection of that hard earned wisdom—a friendly guide to help you sidestep the same time consuming mistakes many of us make.
Think of this as a map of the common pitfalls, each one learned from a real world headache.
The Treachery of fields = '__all__'
When you're starting out, it feels so efficient to just slap fields = '__all__' into your ModelForm's Meta class. Just expose everything, right? I made this exact mistake on a user profile form that went live. A week later, a colleague pointed out that I was accidentally letting users edit their own is_staff and is_superuser status—fields I'd just added to the model for admin purposes. A classic security oversight.
The lesson is simple but critical: Always explicitly list the fields you want to expose using thefieldsattribute (e.g.,fields = ['username', 'email']). This creates a secure "allow list" instead of a dangerous "deny list," protecting you from future model changes.
Forgetting commit=False for Extra Data
I once burned an entire afternoon debugging a feature where comments were being saved without being attached to the correct blog post. The form was valid, the data was there, but the relationship was just… gone. The culprit? I was calling form.save() directly.
The form.save() method has a powerful but easily overlooked argument: commit=False.
form.save(commit=True)(The default): Creates the model instance and immediately hits the database.form.save(commit=False)(The solution): Creates the model instance in memory but doesn't save it to the database yet.
That little pause is crucial. It's your window to add data that isn't part of the form itself, like associating the comment with the current post or the logged in user.
if form.is_valid(): # Create the object in memory, but don't save it yet new_comment = form.save(commit=False)
# Now, add the extra data from the view
new_comment.post = the_current_post
new_comment.author = request.user

# Finally, save the complete object to the database
new_comment.save()
Confusing Create and Update Views
Another classic mix up is using the same ModelForm for both creating and updating an object but forgetting a key piece for the update part: the instance argument. If you pass POST data to a ModelForm without an instance, Django just assumes you want to create a brand new object.
To edit an existing object, you have to tell the form which one you're working with by passing that object to the form's constructor:
For an update view
existing_post = get_object_or_404(Post, pk=post_id) form = PostForm(request.POST or None, instance=existing_post)
By providing the instance, you're telling the ModelForm, "Hey, update this specific record instead of making a new one." This simple step is vital for data integrity, a core concern for the entire developer community. In fact, keeping projects secure and stable is why 44% of Django developers upgrade their frameworks on every stable release, showing a strong commitment to good maintenance. You can learn more about the latest trends in the Django community.
Frequently Asked Questions
After getting the hang of ModelForm, you'll still run into a few questions that pop up time and time again. These are the classic "how do I..." moments you'll see on forums or hash out with your team. Let's tackle them head on.
How Do I Exclude a Field From a Django Model Form?
Easy. You just need to add the exclude attribute to your form's inner Meta class. For example, if you have a created_at timestamp that you definitely don't want users editing, you’d set it up like this:
class PostForm(forms.ModelForm): class Meta: model = Post exclude = ['created_at']
A word of warning, though: I strongly recommend using the fields attribute instead. Explicitly listing the fields you want to show creates an "allow list." This is a safer pattern that prevents you from accidentally exposing a new, sensitive field if you update your model down the road.What Is the Difference Between save commit True and save commit False?
This one is absolutely critical for anything beyond a simple contact form. Understanding the difference is key.
save(commit=True): This is the default. When you callform.save(), Django creates the model instance in memory and immediately saves it to the database, all in one go.save(commit=False): This is where the magic happens. It creates the model instance in memory but—and this is the important part—it stops before hitting the database.
You'll reach for commit=False whenever you need to modify the object before it’s saved. A classic example is assigning the currently logged in user to a post object, which you can only do from your view, not the form itself.
Can I Use a Model Form for a Model with a ManyToManyField?
You sure can. Django is smart enough to handle ManyToManyField relationships right out of the box.
When you include a ManyToManyField in your ModelForm, Django typically renders it as a multiple select input. Once the form is submitted and you've called form.is_valid(), a simple form.save() takes care of everything. Django handles all the background work of creating the right connections in the intermediate "through" table for you. No extra code required.
Ready to build robust, scalable systems without the guesswork? As a Kuldeep Pisda, I partner with startups to accelerate their roadmaps and strengthen their technical foundations from architecture to deployment. If you need an expert to deliver production grade Django applications, let's connect and build something remarkable.
Subscribe to our newsletter.
Become a subscriber receive the latest updates in your inbox.

Member discussion