
Starting a Django Project Without the Headaches
A practical guide to starting a Django project. Learn the real world steps from setup to server, avoid common pitfalls, and launch with confidence.

Staring at a blank terminal, about to start a new project, can be surprisingly intimidating. I remember my first few times getting completely lost in a jungle of tutorials, each one swearing it had the "one true way" to set things up. The noise and conflicting advice can make you second guess your very first command before you have even typed it.
This guide is here to cut through all that. We are going to walk through the initial setup, step by step, and clear up the common sticking points. This is not just about blindly running commands; it is about understanding why you are doing what you are doing, so you can start your project with confidence.
So, why Django? It is a valid question, especially with so many other Python web frameworks out there. Simply put, Django is an absolute powerhouse for building serious, scalable web applications. We are talking about the kind of heavy duty framework that powers giants like Instagram and Spotify. Its "batteries included" philosophy gives you a massive head start right out of the box.
This rich feature set is a huge reason Django has held its ground for so long. As of 2025, Django still commands a hefty 33.22% market share among web frameworks, and its GitHub repository has over 82,000 stars. That popularity is not just for show it means there is a massive, active community and incredible documentation, which is priceless when you are learning or hit a roadblock.
If you are building your very first web application, a good overview can provide some extra context. You can Master App Development with Python by understanding the broader ecosystem.
Starting a new Django project is a bit like laying the foundation for a house. You would not just start throwing up walls wherever you feel like it, right? The same logic applies here. That first command you run sets the entire stage for your application's future.
The initial setup flow is pretty straightforward, and this visual breaks down the first three commands to get your environment squared away.
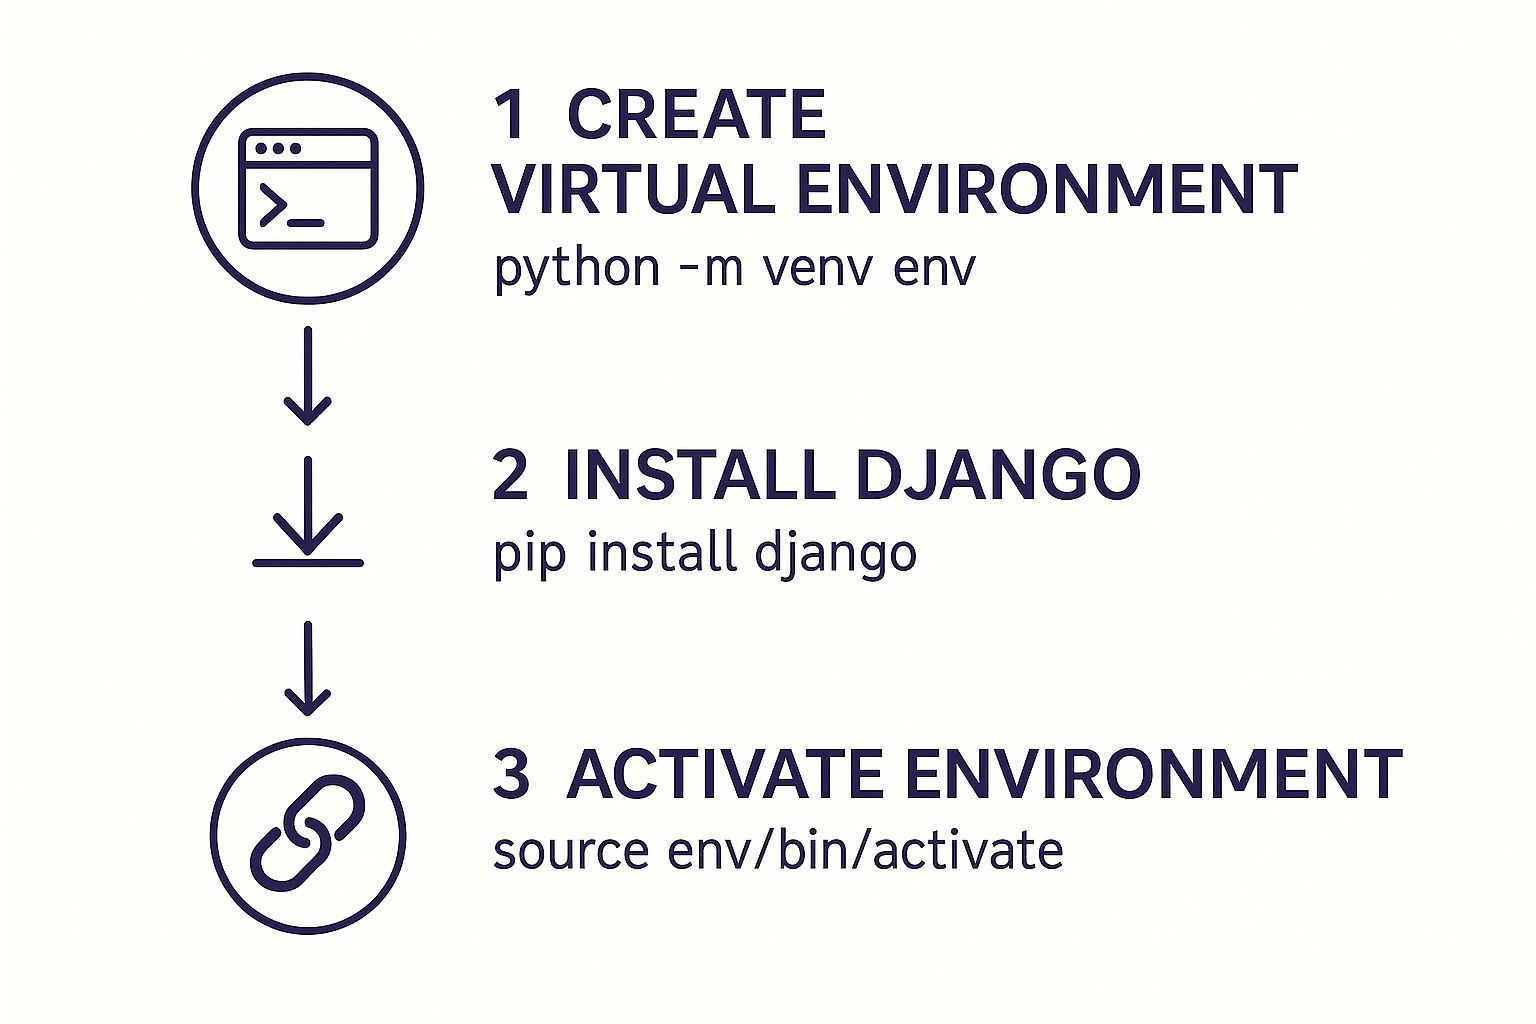
Notice how it all starts with a virtual environment before even touching Django. This is a critical best practice that keeps your project dependencies clean and isolated from day one.
startprojectOnce your environment is active, you are ready for the command that brings your project to life: django-admin startproject myproject ..
Do not forget that final dot! It tells Django to build the skeleton of your application right in the current directory. This is the moment your idea transforms from a concept into a tangible set of files on your machine.
But what does it actually create? It is not just a bunch of empty files; it is a logical structure designed for scalability. Of course, a solid foundation also involves good practices for managing source code, which goes hand in hand with understanding what Django just built for you.
At first glance, the files Django generates can seem a little cryptic. Let's break them down so you know exactly what you are working with from the get go.
When you kick off a new Django project, it hands you a set of core files that act as the central nervous system of your application. Understanding their roles is fundamental, so let's quickly map them out.
| Core Django Project Files and Their Roles | | :--- | :--- | :--- | | File Name | Primary Responsibility | Why It Matters | | manage.py | Your project’s command line utility for administrative tasks. | This is your go to script for running the dev server, creating migrations, and managing your app. You will use it constantly. | | settings.py | The central configuration file for your entire project. | Contains everything from database details and secret keys to installed apps. It is the control panel for your entire project. | | urls.py | Maps URL patterns to the views that handle them. | This file is your project's traffic controller, directing user requests to the correct part of your application. | | wsgi.py & asgi.py | Entry points for web servers to communicate with your app. | Crucial for deployment. WSGI is for traditional synchronous servers, while ASGI supports modern asynchronous features. |
These files form the backbone of every Django project. Getting comfortable with them early on will make your development process much smoother.
I once spent an entire afternoon debugging what I thought was a complex database connection error. Turns out, I had a simple typo in my DATABASES dictionary inside settings.py. That painful lesson taught me to always, always double check the simple things first in that file.
For a deeper dive into organizing your project as it grows, our guide on https://kdpisda.in/how-to-structure-the-django-project-67b052414baa63001bbc0632/ offers more advanced patterns. Mastering this initial blueprint is your launchpad for building something great.
Let’s be honest for a moment. For years, whenever I kicked off a new Django project, I’d completely skip the whole virtual environment step. It just felt like an annoying, unnecessary bit of setup getting in the way of the real coding.
That little shortcut came back to haunt me spectacularly. I found myself juggling two client projects with conflicting package versions, which created a debugging nightmare that cost me a full, frustrating day.
That experience taught me a hard lesson: using a tool like Python's built in venv is non negotiable. It is not just a "best practice" it is a fundamental discipline that separates a hobby project from a professional, production grade application.
Think of a virtual environment as a clean, self contained workshop for each specific project. Anything you install in that workshop a certain version of Django, a package for handling images stays right there. It does not spill out and mess with the tools you are using for another project in the workshop next door.
This isolation is a total sanity saver. It guarantees your project is reproducible. That means another developer (or your future self on a new machine) can set it up and have it work exactly the same way. No more mysterious "it works on my machine" bugs.
Getting one up and running is refreshingly simple. Pop open your terminal in the project's root directory and run a single command:
python -m venv env
This command spins up a new directory named env which contains a fresh copy of your Python interpreter. It is your project's own private little bubble.
Before you can use it, you have to "enter" the bubble by activating it. The command is a little different depending on your operating system:
source env/bin/activate.\env\Scripts\activateOnce it is active, you will usually see your terminal prompt change to show the environment's name. This is your visual cue that you are working inside that isolated space. From this point on, any package you install with pip will be confined strictly to this environment.
A classic rookie mistake is forgetting to activate the environment before running pip install. This installs packages globally on your system, completely defeating the purpose of having an isolated environment in the first place.The final piece of the puzzle is the requirements.txt file. This is just a plain text file that lists every external package your project needs to run.
Once you have installed Django and any other packages you need, you can generate this file automatically with one simple command:
pip freeze > requirements.txt
Now, anyone who clones your project can perfectly replicate your exact setup just by running pip install -r requirements.txt. This single file becomes the definitive blueprint for your project's dependencies, making collaboration and deployment incredibly straightforward.
For more complex setups that involve containers, our Docker setup guide for Django takes you to the next level of project encapsulation.
Okay, our project's foundation is set. Now for the exciting part: actually defining the data that will power our application. This is where your abstract idea starts to take a concrete shape inside Django.
First things first, we need to create our very first Django app. This brings up a classic point of confusion for beginners. What’s the real difference between a Django "project" and an "app"?
Think of it this way: your project is the entire house. It holds all the global configurations, like your database settings, URL routing, and other sitewide rules. An app, on the other hand, is a single room in that house like the kitchen or the bedroom.
Each app is a self contained module responsible for one specific piece of functionality. It could be a blog, a user authentication system, or a product catalog. This modular approach is one of Django's killer features, making your code easier to manage and reuse.
Creating an app is dead simple. From your project’s root directory (the one with manage.py in it), just run this command:
python manage.py startapp core
I often name my first app core because it is going to hold the central, most critical models of the application. Feel free to name it something else descriptive if you prefer. This command spins up a new directory with a handful of files, but the one we are interested in right now is models.py.
This file is where you define your entire database schema using pure Python. A Django model is just a Python class that inherits from models.Model. Each attribute you add to this class represents a field in a database table. It is an incredibly intuitive way to structure your data without ever writing a single line of SQL.
For example, a simple BlogPost model might look something like this:
from django.db import models
class BlogPost(models.Model): title = models.CharField(max_length=200) content = models.TextField() published_date = models.DateTimeField(auto_now_add=True)
def __str__(self):
    return self.title
This small class tells Django everything it needs to know to create a blogpost table. It will have columns for a title (CharField), the main content (TextField), and a publication date (DateTimeField). The real power here comes from Django’s ORM (Object Relational Mapper), which completely abstracts away the database specifics, letting you focus on your application logic.
Django's structured approach has been a cornerstone for building robust web applications for years. Giants like Instagram, Spotify, and Pinterest all built their platforms on Django's scalable and secure foundation. The framework follows the model view controller architectural pattern, providing a clean separation of concerns that is both efficient and scalable. As of 2025, Django continues to evolve with better asynchronous support and even AI integration, ensuring it stays relevant in modern web development.
So, we have a Python class. How do we turn that into a real database table? This is where the magic of migrations comes in. Think of your model as a blueprint and migrations as the detailed instructions for building that structure in your database.
First, you tell Django to create the migration files.
python manage.py makemigrations
This command inspects all your models.py files for any changes new models, added fields, etc. and generates a new migration file. This file is essentially a Python script containing the precise steps needed to apply your schema changes.
Next, you apply those changes to the database.
python manage.py migrate
This command takes all the pending migration files and executes them against your database. It creates the tables, adds the columns, and brings your database schema perfectly in sync with your models. This two step process is a powerful and, more importantly, a safe way to evolve your database over time.
For more complex interactions, like generating forms directly from your models (a huge time saver), our guide on mastering the Django ModelForm provides some deeper insights.
This is the moment of truth. You have laid the foundation and defined your data models; now it is time to see your project come alive.
We are about to fire up Django’s built in development server and witness that glorious "Congratulations!" rocket page. It is a rite of passage for every developer starting a Django project.
Make sure your virtual environment is active, and pop open your terminal in the project's root directory. This is the same folder where you will find the manage.py file.
From there, it is just one simple command:
python manage.py runserver
That’s it. Django will run a few system checks, and if everything looks good, you will see a message confirming the server has started.
Now, open your web browser and head over to http://127.0.0.1:8000/. You should be greeted by the iconic Django success page. Take a moment to appreciate it you have officially brought your project to life.
Seeing the rocket is great, but the real power is just a few commands away. One of Django's most killer features is its automatic admin interface. This tool lets you interact with your data immediately, without writing a single line of frontend code.
To get in, you first need to create a superuser account. Back in your terminal, stop the server with Ctrl+C and run this command:
python manage.py createsuperuser
Follow the prompts to set up your username, email, and a secure password. Once that is done, restart the server with runserver and navigate to http://127.0.0.1:8000/admin. Log in with your new credentials, and you will see the default admin dashboard. It is a bit empty right now, but we are about to fix that.
To make our BlogPost model from the previous section appear in the admin, we need to explicitly tell Django about it. Open the admin.py file inside your core app directory and add these few lines:
from django.contrib import admin from .models import BlogPost
admin.site.register(BlogPost)
Save the file. Your running development server will notice the change and automatically reload. Just refresh the admin page in your browser, and you’ll now see a "Blog Posts" section.
This simple step creates an incredible feedback loop. You can now perform basic CRUD (Create, Read, Update, Delete) operations on your data directly through the admin interface, allowing you to test your model logic instantly.
You are not just building in isolation; you are joining a massive global community. Django is used by over 270,000 websites globally, and its community includes over 138,000 members on Reddit alone. You can find more insights on Django's global usage to understand the framework's impressive reach and support system.
We have gone from a blank terminal to a fully running development server. Think of this as the mental checklist you should run through every single time you start a new project. Getting these fundamentals right from the beginning is the difference between a smooth build and a future filled with tangled dependencies and confusion.
First up, and I cannot stress this enough: always, always work inside a virtual environment. This is not just a "best practice" suggestion; it is the professional standard. It keeps your project's packages neatly contained, preventing conflicts with other projects on your machine and making your setup perfectly reproducible for anyone else. Skipping this step is just asking for trouble later on.
Burn this next part into your brain: the difference between a Django project and a Django app. Your project is the mothership, the main configuration hub for your entire website. The apps are the plug and play features within it like user authentication, a blog, or a product catalog. Keeping this separation clean is your ticket to writing code that is easy to manage and reuse down the line.
Themakemigrationsandmigrateworkflow is your safety net for database changes. Treat it like a two step confirmation process: first, you prepare the changes, and then you apply them. This simple habit will save you from accidentally breaking your database schema.
Finally, make friends with the Django admin panel right away. It’s an incredibly powerful tool that gives you a direct, ready made interface to view and manage your data. You can test your models and see how everything connects without having to write a single line of frontend code. Mastering these foundational habits is what separates a frustrating start from a successful one.
When you are first getting your sea legs with Django, a few questions always seem to bubble up. They are good questions, and getting them sorted out early will save you a ton of headaches down the road. Let's clear the air.
This one trips up everyone at first, so let's make it simple.
Think of a Django project as the entire house you are building. It is the main container that holds everything together. It handles the sitewide stuff: the main settings.py file, the top level URL routing, and the overall configuration for your web application.
An app, on the other hand, is like a single room in that house say, the kitchen or the bedroom. It’s a self contained module designed to do one specific thing really well. A blog is an app. A user authentication system is an app. An e commerce shopping cart is an app. The beauty is that a well built app is portable; you could theoretically lift it out and drop it into another Django project.
Grasping this concept is your first big step toward building clean, modular, and maintainable Django sites. The project is the mothership; apps are the specialized modules that plug into it.
Yes. Unquestionably, yes. In professional development, this is not even a debate.
A virtual environment is like putting a protective bubble around your project. It isolates all the specific Python packages and their versions (like Django 4.2, for example) from every other project on your computer.
This is critical because it prevents version hell. You might have one legacy project that absolutely requires an older version of a library, while your new project needs the latest and greatest. Without virtual environments, these two would clash, and something would break. It also makes collaboration a breeze a new developer can just look at your requirements.txt file, install the exact same packages in their own virtual environment, and get running in minutes.
It really boils down to what you are building and how you like to work. It’s a classic "batteries included" vs. "build it yourself" tradeoff.
Django is famous for being "batteries included." This means it comes with a mountain of powerful features ready to go right out of the box: a fully functional admin panel, a world class ORM for database work, and a battle tested authentication system. For complex, database heavy websites, this is a massive head start.
Flask, by contrast, is a "microframework." It gives you the bare essentials and lets you choose every other component yourself. This offers incredible flexibility, but it also means you are responsible for selecting, integrating, and maintaining the database layer, admin interface, and so on.
If you are building a large application where having a proven structure and getting to market quickly are top priorities, starting a Django project is often the most direct and feature rich path to getting it done.
Are you an early stage startup looking to build a scalable, production grade application without the guesswork? As a Kuldeep Pisda, I partner with founders and engineering teams to accelerate roadmaps and build robust systems with Django, AI, and modern best practices. Let's build something great together.
Become a subscriber receive the latest updates in your inbox.


Member discussion